
[Deprecated] Crypto OnRamp
Table of Contents
- Introduction
- Actors
- Important Considerations
- Purchase Flow Diagram
- Crypto Asset Purchase Flow
- Step 1 – Counterparty informs the desired amount
- Step 2 – Company creates a quote
- Optional Step – Simulate payment amount
- Step 3 – Generate Pix Dynamic QR Code
- Step 4 – Trace sends payment confirmation
- Step 5 – Create FX Order
- Step 6 – Trace processes settlement
- Step 7 – Await payment instruction
- Step 8 – Company makes the payment
- Step 9 – Trace settles the transaction
Introduction
This document presents the flow for OnRamp (purchasing) crypto assets (stablecoins) using the Trace Finance Exchange and Pix APIs. It is intended for partners developing their own solutions integrated with Trace’s infrastructure. Some steps described here may not be required for all implementations — each client should determine the best flow based on their product needs.
Prerequisites
Before reading this documentation, it is recommended that the reader reviews the following topics:
Important Considerations
- The counterparty must be registered and approved in advance.
- The counterparty’s bank account must also be registered beforehand.
OnRamp (Purchase) Flow Diagram
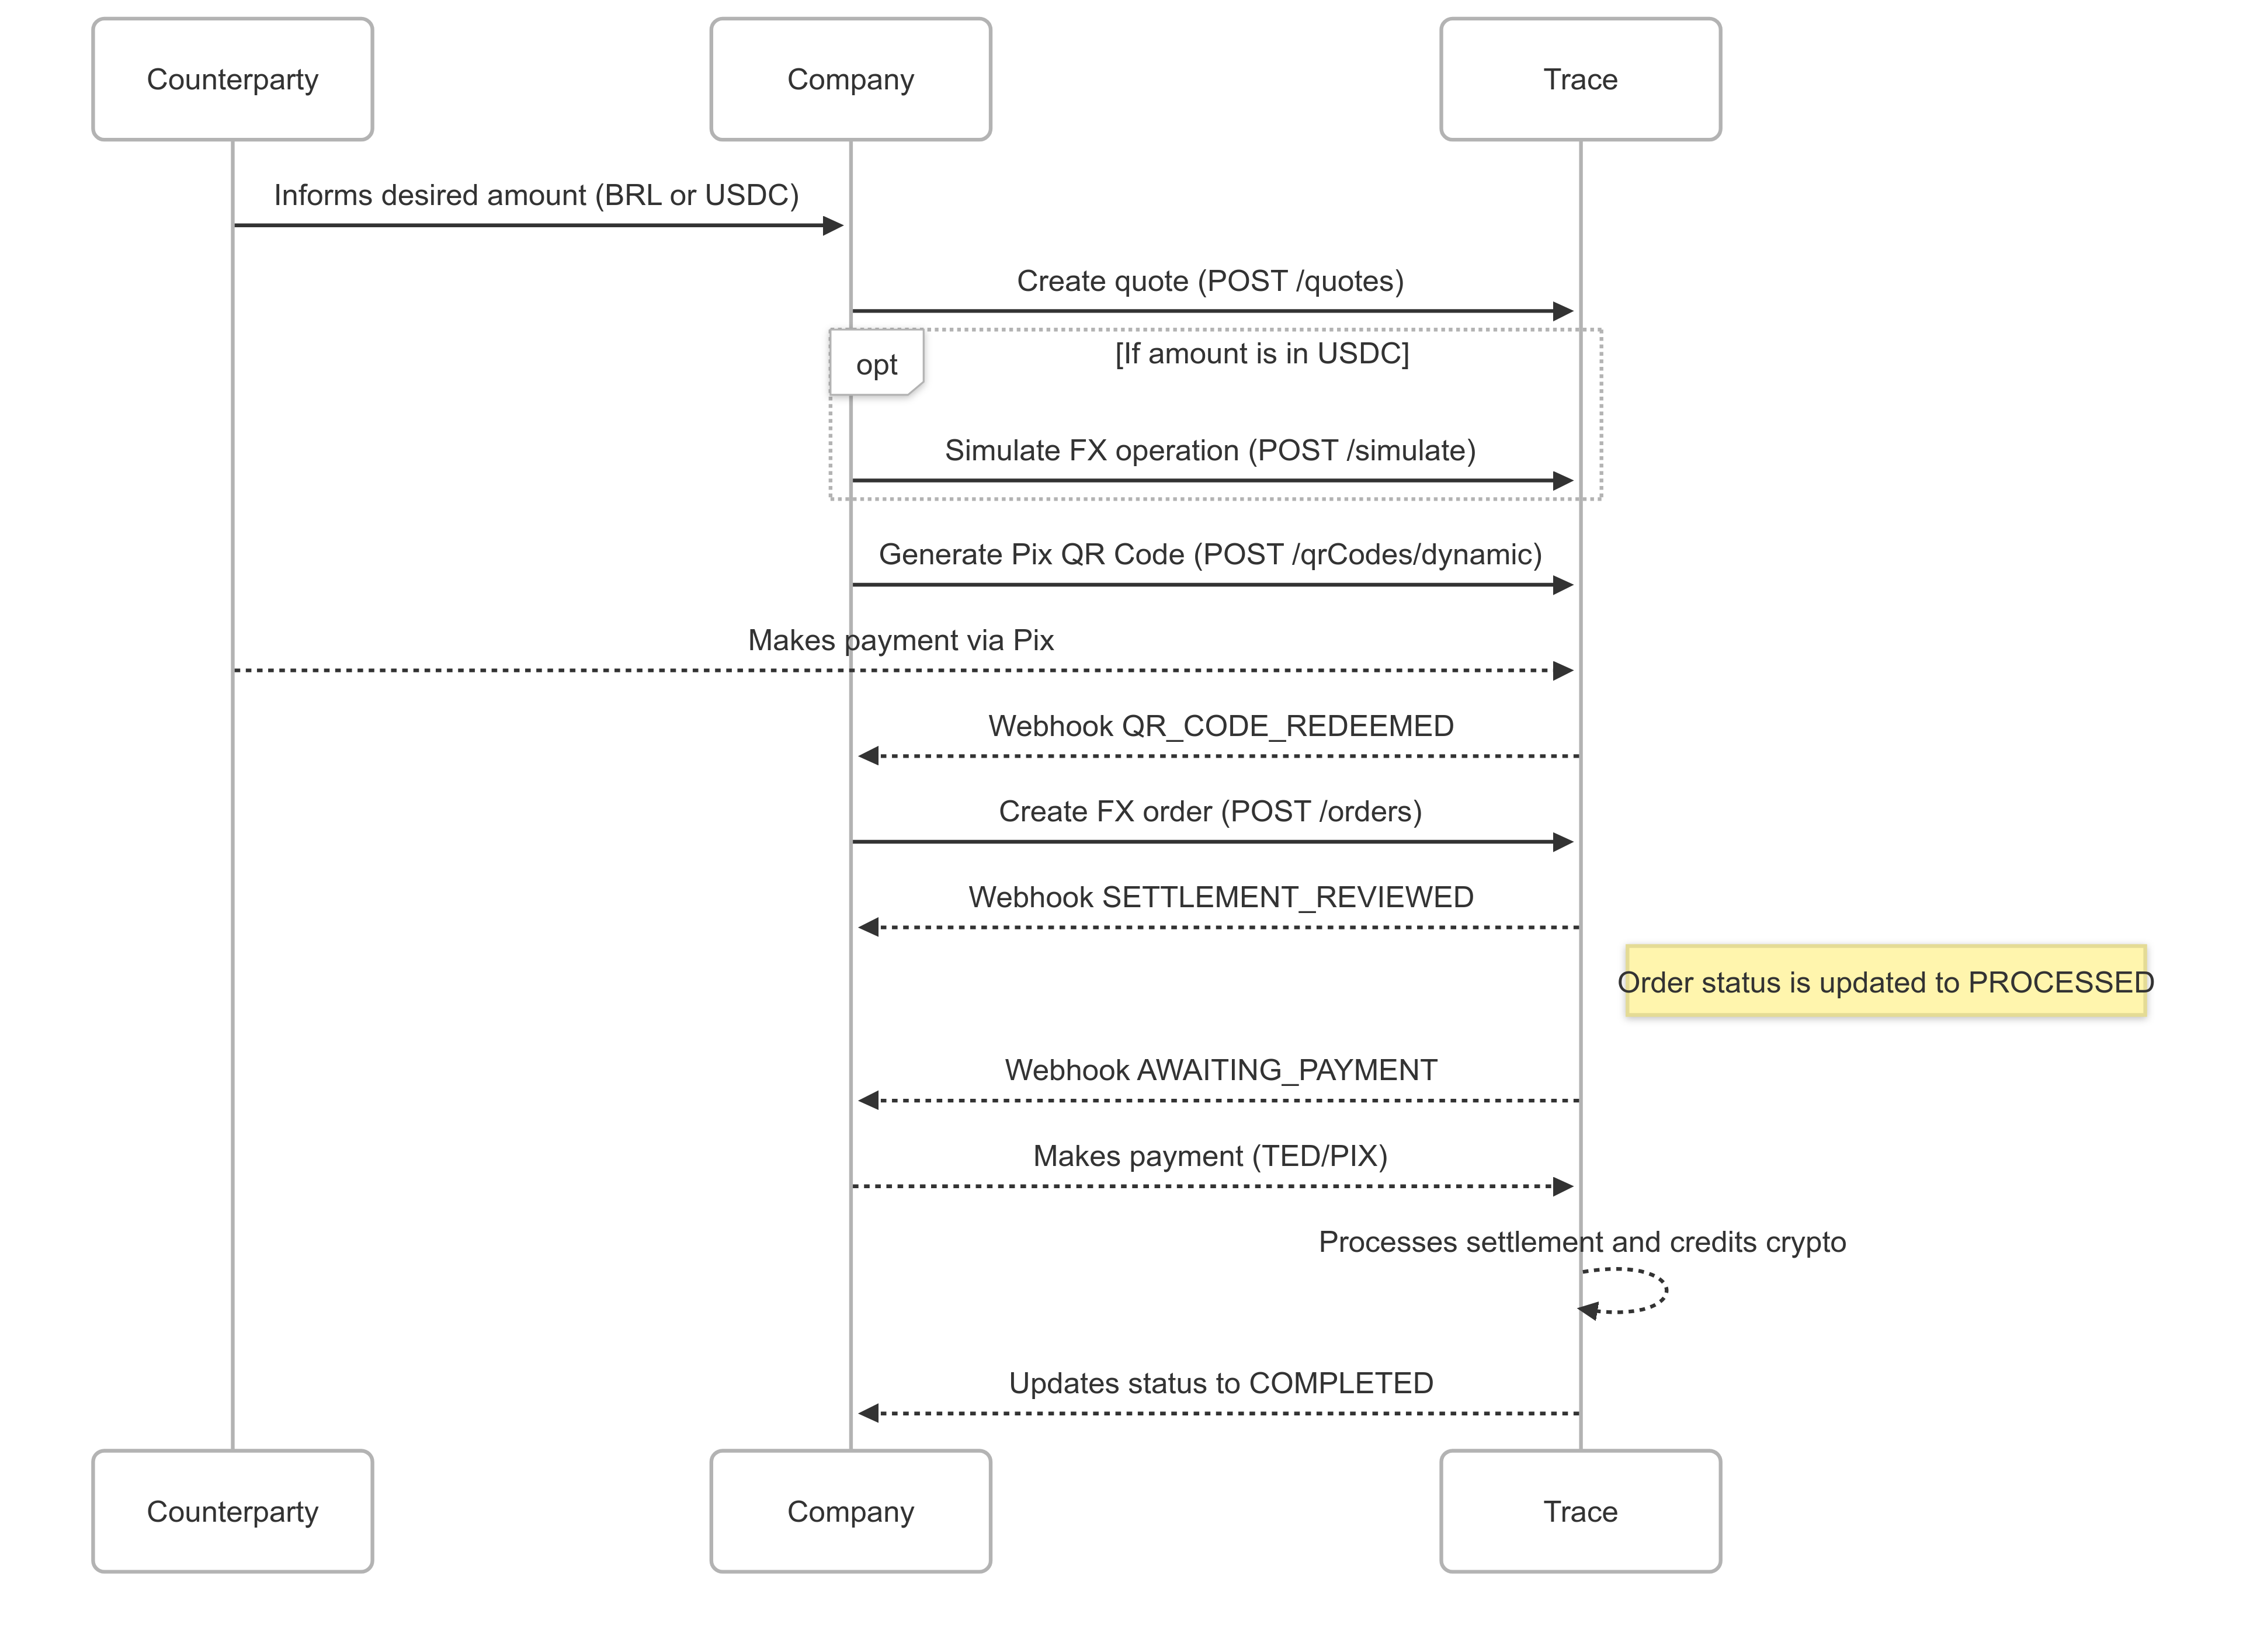
Crypto Asset Purchase Flow
Step 1 – Counterparty informs the desired amount
The Counterparty provides the amount they wish to purchase. This can be expressed in BRL or directly in the target crypto asset.
Step 2 – Company creates a quote
The Company creates a new quote using the informed amount. The quote should have a predefined expiration time.
curl --request POST \
     --url https://faas.sandbox.tracefinance.io/exchange/api/quotes \
     --header 'accept: application/json' \
     --header 'content-type: application/json' \
     --data '
{
  "currencyPair": {
    "source": "BRL",
    "target": "USDC"
  },
  "baseCurrency": "USDC",
  "expiresIn": "300"
}'
This request creates a quote valid for 5 minutes.
Optional Step – Simulate payment amount
If the counterparty provided the amount in crypto (e.g., USDC), the Company may simulate the FX operation to calculate the equivalent BRL payment value.
curl --request POST \
     --url https://faas.sandbox.tracefinance.io/exchange/api/orders/simulate \
     --header 'accept: application/json' \
     --header 'content-type: application/json' \
     --data '
{
  "counterpartyId": "counterparty-id",
  "quoteId": "quote-id",
  "currencyPair": {
    "source": "BRL",
    "target": "USDC"
  },
  "amount": {
    "value": "100000",
    "currency": "USDC"
  }
}'
You must provide both the previously created
quoteIdand thecounterpartyId.
Step 3 – Generate Pix Dynamic QR Code
The Company generates a dynamic Pix QR Code for the counterparty to make the payment.
curl --request POST \
     --url https://faas.sandbox.tracefinance.io/pix/api/qrCodes/dynamic \
     --header 'accept: application/json' \
     --header 'content-type: application/json' \
     --data '
{
  "bankAccountId": "bankAccount-id",
  "amount": {
    "value": 1500000
  },
  "expiresIn": 3600,
  "payer": {
    "name": "Trace Finance",
    "taxType": "CNPJ",
    "taxId": "61190760000101"
  },
  "validations": []
}'
The QR Code expiration (
expiresIn) must be less than the quote expiration to ensure the quote remains valid during payment.
Step 4 – Trace sends payment confirmation
Once the QR Code is paid, Trace emits a webhook event QR_CODE_REDEEMED, indicating that the payment was completed.
Step 5 – Create FX Order
The Company, upon receiving the webhook, must create an FX order to register the transaction.
curl --request POST \
     --url https://faas.sandbox.tracefinance.io/exchange/api/orders \
     --header 'accept: application/json' \
     --header 'content-type: application/json' \
     --data '
{
  "idempotentId": "idempotent-id",
  "counterpartyId": "counterparty-id",
  "targetBankChannelId": "targetBankChannel-id",
  "quoteId": "quote-id",
  "currencyPair": {
    "source": "BRL",
    "target": "USDC"
  },
  "amount": {
    "value": "1500000",
    "currency": "BRL"
  }
}'
Provide the
quoteId,counterpartyId, and atargetBankChannelIdof type CRYPTO_WALLET, which defines where the assets will be delivered.
Step 6 – Trace processes settlement
After the order is created, Trace’s operations team will process the request and generate a settlement. A webhook event SETTLEMENT_REVIEWED will be triggered containing the payment and settlement instructions.
Payment instructions are available in the
sourceBankingChannelfield of theSETTLEMENT_REVIEWEDevent.
At this point, the order status is updated toPROCESSED.
Step 7 – Await payment instruction
The payment should only be made after receiving theAWAITING_PAYMENT event.
Step 8 – Company makes the payment
The Company initiates a TED or Pix transfer to the account specified in sourceBankingChannel.
Step 9 – Trace settles the transaction
After detecting the payment, Trace updates the settlement status to AWAITING_SETTLEMENT, and upon completing the crypto transfer to the counterparty’s wallet, both the order and settlement statuses are updated to COMPLETED.
Updated 10 months ago